

Photo by Jeremy Bezanger on Unsplash
Learning Bicep: Syntax and Basic Deployment
💪Flex like a wrestler💪


I enjoy writing infrastructure as code (IaC), but using ARM templates written in JSON gave me headaches.
Thankfully Bicep is a much more simple way to write IaC for Azure without losing any functionality.
Installing Bicep Resources
To start writing Bicep code, you need:
- Visual Studio Code: code.visualstudio.com
- Bicep VS Code extension: marketplace.visualstudio.com/items?itemName..
You can use PowerShell to deploy Bicep templates, but I like the Azure CLI, so for this guide you will need the Bicep Azure CLI command group, which is installed with this Azure CLI command: az bicep install
Examining Bicep Syntax
Parameters
- Parameters in Bicep are pieces of data that get passed into resources (more on resources in a bit) from outside the template file
- This means that when you deploy the Bicep file via Azure CLI or PowerShell, you will be prompted to enter the data at that time, rather than hard-coding the values into the template
- This helps with code reusability and sharing
- An example parameter declaration:
param location string = 'East US' - You may wonder why 'East US' is there if the purpose of parameters is so that we don't have to hard-code values
- This is because when you define a parameter (i.e. put a '=' and then a value), you are defining a default option, so when you go to deploy the file, you will still be prompted to enter a value, but you can skip the prompt and the default value (East US) will be used
- When using a decorator, the syntax looks like this:
@description('The location of the resource.')
param location string
 Here you can see that, after typing '?', the same text that is in the description for the parameter 'location' is printed out.
Resources
- To deploy resources in Bicep, you must first define the resources you want
- The general syntax for the outer part of a resource definition looks like this:
resource symbolicNameForResource 'Microsoft.Network/virtualNetworks@2021-05-01' = { // properties } - Symbolic names are used to refer to the resource from within the Bicep file
- Symbolic names do not appear in Azure
- The "name" property is used to name the resource as it should appear in Azure
- Symbolic names do not appear in Azure
- The flamboyant little string next to the symbolic name defines the resource type and its API version
- 'Microsoft.Network/virtualNetworks' = the resource type (virtual network)
- '@2021-05-01' is the API version we will use
Variables
- Variables in Bicep are used when you have data that most likely won't change from deployment to deployment
- If you do need to change something, you only change the variable and not each instance of the variable throughout the file(s)
- Syntax for variables is as follows:
var myVariableName = value
These are fundamental concepts in the Bicep syntax. The bulk of what you write will probably be resources and parameters.
Next, we will examine those concepts in a small bit of Bicep code that creates a storage account, and you can copy the code, change it, deploy it, or do whatever you want with it.
Analyzing Bicep Code
// The description decorator is optional
// The text within the parenthesis appears during deployment
// Description decorators are immediately followed by a parameter declaration
@description('The location of the resource.')
param location string

var myAccessTier = 'Hot'

// Define the resource we want to create (storage account) and the API version
resource storageAccount 'Microsoft.Storage/storageAccounts@2021-08-01' = {

  // Attributes
  name: 'aReallyGreatStorageAccount'
  location: location // This is the location defined as a parameter!
  sku: {
    name: 'Standard_LRS'
  }
  kind: 'StorageV2'
  properties: {
    accessTier: myAccessTier
  }
}
You can see a parameter, description decorator and a resource declaration, which we covered earlier.
You also see a bunch of text within the storageAccount resource, and that text defines the attributes of the storage account.
The attributes may seem pretty self-explanatory since the keywords describe the resource pretty well.
- The name is the name of the resource name, as it will appear in Azure.
- The location, in our example, uses the parameter we specified earlier
- The SKU (I've heard it pronounced like 'skew' or 'skoo' but I pronounce the letters individually) is the more specific type of the resource
- In this case it is the type of redundancy for the storage account.
- For example, a Public IP resource SKU would define either a 'Basic' IP address or 'Standard'
- 'Kind' is... the kind of storage account
- In the Properties block, we defined the access tier for the storage account, and use the variable to pass in the string that holds the actual value that Bicep needs
Deploying Bicep Code
You can deploy your Bicep file with the Azure CLI, Azure PowerShell module, or the Azure Cloud Shell. For this tutorial, I will use the CLI.
You can deploy Bicep files to resource groups, subscriptions, management groups, tenants, and to your local machine.
The basic outline for deploying Bicep files with the Azure CLI is as follows:
az deployment group create --resource-group myResourceGroup --template-file .\template.bicep
- If you are deploying to a subscription, management group, or tenant, swap
--resource-group myResourceGroupwith--location myLocation
Here is the command I am running for the storage account example:
az deployment group create --resource-group rg-lamp --template-file .\notmain.bicep
My resource group is named "rg-lamp" and my template file is named "notmain.bicep".
When running the command, I am prompted to enter a location, and so I entered: East US.

After that, the program thinks for a bit and then returns a bunch of JSON text, which is good!
Now, you can check the Azure Portal to see if the storage account is deployed.
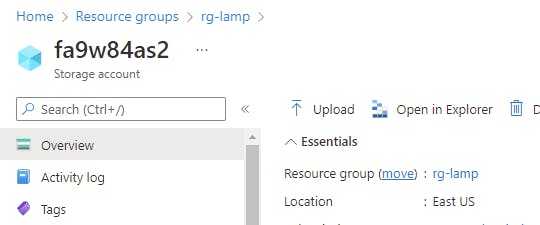 You can see our storage account has been deployed! Notice that it went to the correct resource group too. Please ignore my horribly named storage account!
Note that sometimes it can take a few minutes for the changes to be reflected in the Portal.
Congratulations! You are an astonishing, astounding, and awe-inspiring Azure engineer!
Next Steps
Now that you've seen the basic syntax for Bicep, and seen how you can deploy the template files, you should try to modify the storage account code provided earlier!
🦾